You can set and edit your blog's robots setting now from the Blogger's dashboard settings. With new advance changes in Blogger dashboard, Blogger blogs have now become SEO friendly. Before that your blog’s indexing and SERP (search engine results page) listing was at the mercy of the search engine crawlers.
Only way you could implement robots tags in your Blogger blog by manually adding Meta tags to the template of the blog. But this didn’t help you as there was no way to add separate robots tags for each page and posts. It was one of the reason Blogger was lacking behind in SEO settings and user friendliness from other blogging platforms.
Now you can set and edit robots tags for the Blogger blog's home page, index pages (i.e. labels, archive pages) and for each individual posts and pages. This gives you complete and proper control over your blog’s SEO. In this post we will see how to:
Using "All" tag is not essential but not harmful. Crawlers will automatically crawl and index you blog without the header tag "All". It's the other restrictive robots tags you should properly use. As we have an idea about these robots tags, now try to implement them in the blogger.

Now take this particular blog for example and try to find what's appropriate for this blog in custom header tags.
Whatever the case may be you do not want the label pages to be indexed by the search engine. This will reduce your PageRank and SERP position severely and search engines will treat them as auto-generated pages with duplicated content. Google ignores both auto-generated and and duplicate pages in a website/blog. Label pages have both qualities.
So; you want to set "nofollow" and "noindex" as robots tag for the archive and search page or label pages. And as a bonus use "noimageindex" for the same reason as home page.
Also if your are using meta description for your blog properly then you should tick "noopd" for each category as it prevents search engine to import metadata from Open Directory project (DMOZ).
You must note; these suggestions are made for a typical blogger blog. If your blog very different then you should set the custom robot's tags according to your blog and its content. Use them Properly and it will help increase your search engine visibility and PageRank.
After clicking it you will see that "default" option is ticked. It means that whatever you saved in the "Custom robots header tags" for "default for posts and pages" will be implemented.

For making changes of Robots header tags; first untick "default" option and tick the tags you want save your post/page and click publish.

You will not find them in the page-source view of your blog's pages as they are not implemented in the template of the blog. These tags can only found in HTTP header fields as Google accepts robots tags which are directly added to the Headers of the HTML Page. Once you applied the custom robots tags follow these instructions for any Blogger page types.
Only way you could implement robots tags in your Blogger blog by manually adding Meta tags to the template of the blog. But this didn’t help you as there was no way to add separate robots tags for each page and posts. It was one of the reason Blogger was lacking behind in SEO settings and user friendliness from other blogging platforms.
Now you can set and edit robots tags for the Blogger blog's home page, index pages (i.e. labels, archive pages) and for each individual posts and pages. This gives you complete and proper control over your blog’s SEO. In this post we will see how to:
- Robots Meta tags for blogger and their meaning.
- How you can add Robots tags your entire Blogger blog.
- What you Robots tags should tick/use for each type of page in the Custom robots header tags settings.
- Adding/Editing Robots tag for individual Blogger posts and pages.
- Checking if the Robots tags are working.
Meaning of Robots Meta Tags for Blogger Blog
Before you set robots tags for your blog you must what each tags means and how they will impact your blog’s Indexing in search engines like Google and Bing. Let’s look at the table below;| Robots Tag | Bing | Meaning and Descripting | |
| All | Yes | No | No restrictions for indexing the page. This is default for all pages. Do not worry if you are not using it. |
| nofollow | Yes | Yes | Do not follow the links on the page. |
| noindex | Yes | Yes | Do not show webpage in search results and do not show a "Cached" link in search results. |
| none | Yes | No | Combination of noindex, nofollow |
| noarchive | Yes | Yes | Do not show a "Cached" link in search results. |
| nosnippet | Yes | No | Do not show a snippet in the search results for this page. |
| noimageindex | Yes | No | Do not index images on this page. |
| notranslate | Yes | No | In search results, do not offer translation of this page in other languages. |
| noodp | Yes | Yes | Do not use metadata from the Open Directory project (DMOZ) for titles or snippets shown for this page. |
| unavailable_after | Yes | no | Do not show this page in search results after the specified date/time. Date/time must be specified in the RFC 850 format. (11 Oct 2014 18:00:00 BST) |
Using "All" tag is not essential but not harmful. Crawlers will automatically crawl and index you blog without the header tag "All". It's the other restrictive robots tags you should properly use. As we have an idea about these robots tags, now try to implement them in the blogger.
Adding Robots Tags to Entire Blogger Blog Properly
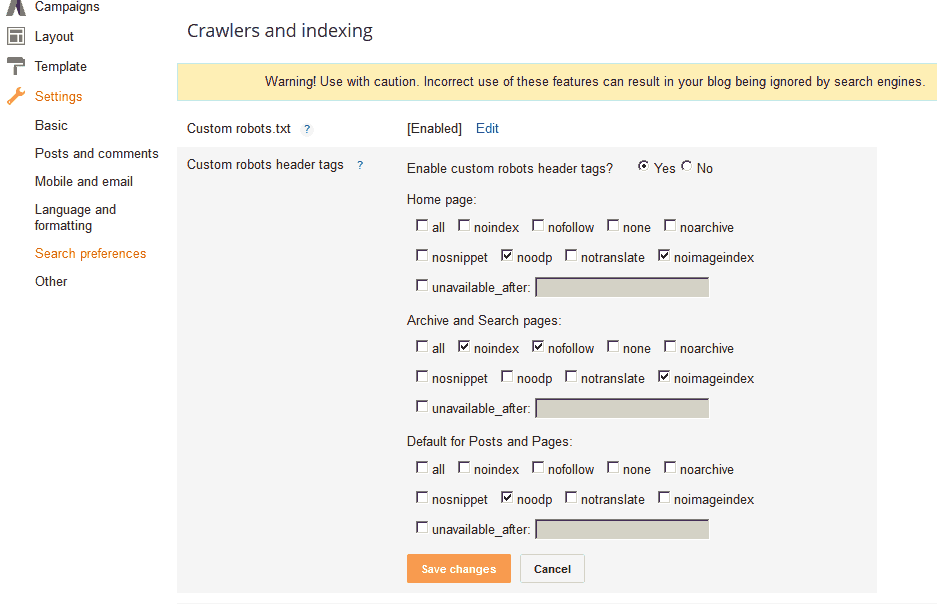
Now For adding Custom Robots Header Meta Tags to the blogger blog,- Go to your Blogger blog's Dashboard, > Settings > Search preference > Crawlers and Indexing.
- Click "Edit" beside "Custom robots header tags".
- Tick "Yes" radio button.
- Now Set the header tags for "home page", "archive and search page", "default for posts and pages" according to your blog's need.
- Click "Save changes".
What Robots Tags should you Tick/Use for your Blogger Blog
Now question still remains what are tags you should tick in the "Custom robots header tags" setting in blogger. For this you should properly analyze you blog. As you see the "Custom robots header tags" setting in blogger is divided in three parts; "home page", "archive and search page" and "default for posts and pages".
Now take this particular blog for example and try to find what's appropriate for this blog in custom header tags.
Robots Header Tags for Blogger "home page"
You definitely allow search engines to index your blog's home page. However, your home page also is a accumulation of summary of your posts and contains snippet with automatic small sized image. These images might be problem and will be treated as a duplicated item by the crawlers. So, here just tick "noimageindex" for the home page. This will not impact your home page's visibility in the search engine.Robots Header Tags for Blogger "archive and search page"
This section is for archive and search pages or the label pages of the blog. As you know label pages shows the links and it may contain the summary of your posts in the blog with auto-generated image or your full post depending on your blog's templates and use of jump breaks.Whatever the case may be you do not want the label pages to be indexed by the search engine. This will reduce your PageRank and SERP position severely and search engines will treat them as auto-generated pages with duplicated content. Google ignores both auto-generated and and duplicate pages in a website/blog. Label pages have both qualities.
So; you want to set "nofollow" and "noindex" as robots tag for the archive and search page or label pages. And as a bonus use "noimageindex" for the same reason as home page.
Robots Header Tags for Blogger "default for posts and pages"
Generally, you want these post and pages to be indexed. So, leave it empty and do not tick any tag here. If you want to different tags for your particular posts and pages; after saving your work in "Custom robots header tags" you can do it from the post/page editor.Also if your are using meta description for your blog properly then you should tick "noopd" for each category as it prevents search engine to import metadata from Open Directory project (DMOZ).
You must note; these suggestions are made for a typical blogger blog. If your blog very different then you should set the custom robot's tags according to your blog and its content. Use them Properly and it will help increase your search engine visibility and PageRank.
Add Robots Tag for individual Blogger Posts and Pages
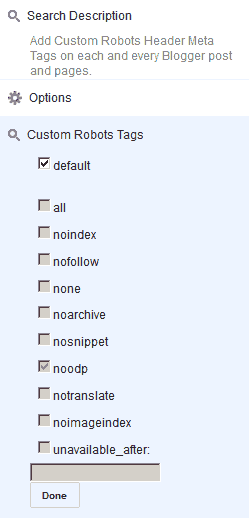
After enabling and saving your settings in "Custom robots header tags"; you can now set separate robots tags for each post and page in the Blogger. For this; when you are writing in the post/page editor (creating a new post/page) click the "Custom Robots Tags" on the right under post settings.After clicking it you will see that "default" option is ticked. It means that whatever you saved in the "Custom robots header tags" for "default for posts and pages" will be implemented.

For making changes of Robots header tags; first untick "default" option and tick the tags you want save your post/page and click publish.
Check if the Custom Robots Tags are Working
You do not have to worry about the "Custom robots header tags" as they will work properly and you do not need to make any changes to the template of the blog or any other settings for that. But I know you have a curious mind and you want to see if your settings are showing and working.
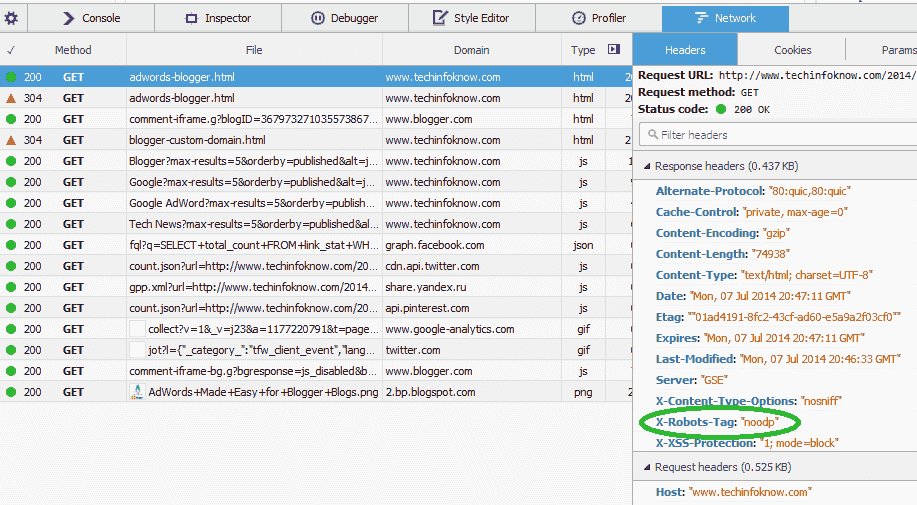
You will not find them in the page-source view of your blog's pages as they are not implemented in the template of the blog. These tags can only found in HTTP header fields as Google accepts robots tags which are directly added to the Headers of the HTML Page. Once you applied the custom robots tags follow these instructions for any Blogger page types.
- Go to you blog and view any page.(Home/posts/pages/label-pages)
- In major browser; right click on the blog's page and click "Inspect element". This will open the "Developer Tools" in the browser. Also can open it :
For Chrome, go to Menu > Tools > Developer Tools > Networks or keyboard shortcut "CTRL+SHIFT+I".
For Firefox; Menu > Developer > Network or the keyboard shortcut "CTRL+SHIFT+Q". - Click the "Network" tab.
- From several columns/items, find the URL of the current page and click it.
- You will see two sections on the displayed information "Request Headers" and "Response Headers".
- Under "Response Headers"; you will find "X-Robots-Tag" along with you selected robots tags. (Image above)

Post a Comment